The following content may contain affiliate links. When you click and shop the links, we receive a commission.
One of my favorite things to DIY over the holiday season is always greeting cards! When I was a little girl, I used to craft handmade Thank You Notes for all my gifts during Christmas. It was one of my favorite things to put my creative energy into, and I still love it! I’d use construction paper, glue, and sometimes glitter– and whatever else we had laying around the house to craft with. I think homemade greeting cards and thank-you notes can be that much more special…especially if you don’t have a huge budget for the actual gift. Something that has taken time to put together always makes such a lovely impression.

in this picture
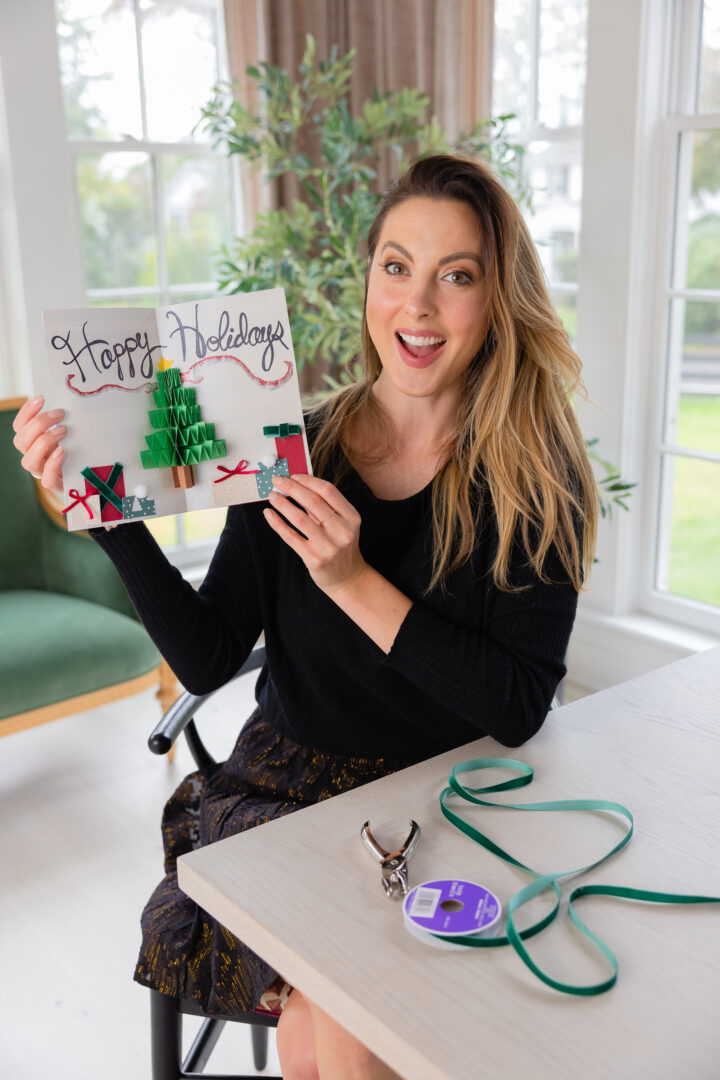
This year I decided to make some pop-up cards! I’d done them before for Homemade birthday cards or Father’s Day cards, and I thought it was time to explore one for Christmas! I absolutely love how this turned out, and it’s an easy enough craft for kids to help with, too. Feel free to make it your own, including mixing up the colors and styles of the gifts under the tree. It’s a great way to use up random scraps of wrapping paper as well!

in this picture
Materials…
- Green, yellow and brown construction paper (for tree)
- Thin ribbon (for present bows)
- Thicker ribbon (to secure card shut)
- 8.5 by 11″ paper (for card itself)
- Decorative paper (for presents)
- Scissors
- Glue
- Sharpie Marker
- Glitter Glue Pens
- Ruler
- Single Hole Punch
Step 1:
Select, Cut, Fold, Decorate
Select the paper you will be using for the card itself. Cut the paper to 8.5 X 11″ and then fold it in half. Cut strips of decorative paper and add it to the outside of the card.
Step 2:
Make an accordion with green paper
Take a piece of green construction paper and create an accordion- fold it in half and then unfold, then fold the halves in half and unfold, repeat one more time to the outer section and then fold like an accordion (folding on top and then folding on the bottom and repeating until you reach the other side of the paper).
Step 3:
Measure and cut green paper
Once the green construction paper is folded up, cut it at 5 cm, 4 cm, 3 cm, 2 cm, and 1 cm. Make sure the pieces end with flaps pointing in the same directions.
Step 4:
Create the tree
Locate the paper you cut into a card and place it in front of you. Starting with the 5 cm piece (which will be the tree’s bottom), glue the last flaps horizontally to the center of the card. It will create a fan/rainbow effect. Place glue also in the middle to secure the piece so it won’t pop completely out. Repeat this with the other green pieces, placing them above the one before to make a tree!
Step 5:
Add the star and trunk
Cut a star out of yellow construction paper and a trunk out of brown construction paper and add it to the tree.
Step 6:
Make presents
Make presents using your favorite holiday paper and ribbon and place them around the tree.
Step 7:
Greeting Message
Write your greeting message at the top using a Sharpie marker and underline it with glitter glue pens!
Step 8:
Final Touches
Hole punch and tie the card shut. Give this homemade pop-up holiday card to a loved one or friend

Shop the post…
[show_shopthepost_widget id=”4903495″]

This is such a cute idea. Wish my son was still little so we could do this together. I think I will make a few myself for special friends and family.
Well maybe you can still do it together! 😉