Bûche de Noël
This is the most gorgeous dessert to make for the holidays, but it's definitely involved and takes a bit of time. If you have the patience, I cannot recommend a more beautiful edible centerpiece!
Equipment
- Jelly Roll Pan
- medium mixing bowl
- large mixing bowl
- Parchment Paper
- Cooking Spray
- Stand Mixer
- Kitchen Towel
- Fine Mesh Sieve
Ingredients
For the Cake:
- 6 large eggs, separated
- 1/2 cup all-purpose flour
- 1/4 cup unsweetened cocoa powder
- 3/4 cup sugar, divided into 2
- 1/4 tsp kosher salt
- powdered sugar, for sprinkling
For the Filling:
- 1 1/4 cup unsweetened coconut cream
- 1/4 cup powdered sugar
- 1 tsp pure vanilla extract
- 1 pinch kosher salt
For Decorating:
- 1/2 cup softened butter
- 1 1/2 cup powdered sugar, plus extra for garnish
- 5 tbsp unsweetened cocoa powder
- 1 tsp pure vanilla extract
- 3 tbsp unsweetened coconut cream
- 1 pinch kosher salt
- cranberries, for garnish
- rosemary sprigs, for garnish
Instructions
Cake:
- Preheat the oven to 350º F and line your jelly roll pan with parchment paper and then spray with cooking spray. You want this cake to eventually easily peel from the parchment paper, so don’t be shy with the grease.
- Meanwhile, in a medium mixing bowl, combine flour, cocoa powder, and salt, and set aside.
- Now it’s time to separate the eggs. If you’ve never separated eggs before, it’s best to use very cold eggs to do this so that you don’t unintentionally break the yolk.
- Once you’ve separated all six egg whites from the egg yolks into two separate bowls, pour the egg yolks into a stand mixer bowl.
- Beat the egg yolks until thick, and slowly add 1/2 cup of sugar and beat until pale.
- Once the egg yolk and sugar mixture is pale, slowly add in the flour mixture until combined well.
- Pour egg yolk, sugar and flour mixture into a separate large mixing bowl, clean the stand mixer bowl, and return it to the stand mixer.
- Add the egg whites to the stand mixer bowl and beat until soft peaks form.
- Add remaining 1/4 cup of sugar to the egg whites slowly, continuing to beat until stiff peaks form.
- Gently fold egg whites into the egg yolk/sugar/flour mixture in a few batches, using a spatula to combine slowly, making sure not to collapse all the whites at once.
- Pour the batter into your prepared jelly roll pan and spread it until it evenly covers the entire surface.
- Pop you jelly roll pan into the oven for 12-14 minutes. The cake is ready when it bounces back slightly when you press on it.
- Remove the cake from the oven. Meanwhile, lay out a clean kitchen towel on your counter and sprinkle it with a thin layer of powdered sugar using a fine mesh sieve.
- Your cake should be separating away from the edges of your jelly roll pan, and if it needs help, take a butter knife or offset and carefully help it separate. The goal here is to have the cake still warm (having been out of oven no more than 10 minutes max), but not attached to the pan at all. Remember what I said about the grease? This is why.
- Once you're sure your cake is separated from the pan, align the pan edge next to your kitchen towel covered in powdered sugar and tilt the pan gently upwards on its side, so that you can carefully transfer the cake face down onto the sugar. Your kitchen towel will be bigger than your cake, so try to aim for the center of the towel.
- Once the cake is transferred, immediately remove the parchment paper from the bottom, and adjust the cake on the towel so that the towel appears like a frame around the edges of the cake.
- Using the short end of the kitchen towel, slowly and carefully roll the cake with the towel tightly into a log. Your towel should be rolled up with the cake, similar to how the filling with eventually lay rolled in the cake. Don't worry, this is just so that we can cool the cake down in that shape and make it easier to re-roll it once we apply the filling.
- Place your rolled up cake and towel log back onto the jelly roll pan and place it in the coolest part of your kitchen/home to cool completely. Don't put it in the fridge because it will dry out the cake and make it more likely that it will break when you unroll it. A dark, cool corner will work just fine.
Filling:
- Back to your stand mixer: Beat together your coconut cream, powdered sugar, vanilla extract, and a pinch of salt until peaks start to form. Once reaching whipped cream consistency, place it in the fridge until ready to use.
- When your rolled up cake and towel log are room temperature, carefully unroll the cake so it's flat and take your whipped cream and spread it across the entire flat surface evenly.
- Using your kitchen towel, carefully roll your cake and the whipped cream back into a log shape it was in before, but this time, keep the towel out of the roll. The towel should remain on the outside, slowly and carefully helping the cake tightly roll itself into the log shape.
- Once the cake has been rolled up, tuck the top of the kitchen towel gently under the seam so that the log is wrapped tightly around by the towel. Place it back on the jelly roll pan and into the fridge for 1-2 hours, or up to overnight. The longer it sits in the fridge, the better set the cake and the whipped cream will be and the more flavorful the end result will be.
Frosting:
- Now back to our stand mixer! Beat the butter until smooth. Add the powdered sugar and cocoa powder and beat until no lumps remain. Add the vanilla, coconut cream, and salt and combine everything until buttercream is smooth and no lump remain.
Frosted Cranberry Garnish:
- Wet your hands and roll the cranberries in your palm and then drop them into a small bowl of granulated sugar. Toss them around until coated.
Serving:
- Take your cake out of the fridge and dust off as much of the powdered sugar as you can because it will prevent the buttercream from sticking.
- Next, trim the ends of the log so it has a nice clean edge with which to admire all that hard work you did rolling that sucker up! LOL
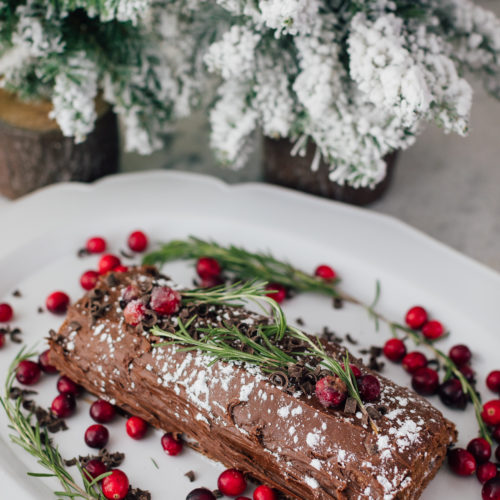
- Frost the entire log with the buttercream, dust lightly with powdered sugar, and add some rosemary sprigs for garnish, and some frosted cranberries, and serve!
Nutrition
Nutrition Facts
Bûche de Noël
Amount Per Serving (1 slice)
Calories 511
Calories from Fat 270
% Daily Value*
Fat 30g46%
Saturated Fat 17g106%
Cholesterol 123mg41%
Sodium 267mg12%
Potassium 289mg8%
Carbohydrates 58g19%
Fiber 3g13%
Sugar 45g50%
Protein 8g16%
Vitamin A 686IU14%
Vitamin C 1mg1%
Calcium 34mg3%
Iron 3mg17%
* Percent Daily Values are based on a 2000 calorie diet.
Tried this recipe?Let us know how it was!